Structured data (datasets)
Overview of the Data Catalogue tabs: Predefined datasets, Created datasets, and File storage, including how to view, use, and manage workspace data.
To see data available in your workspace, go to the Data Catalogue tab.
- The Predefined datasets tab shows datasets that are queried by data integrations from their corresponding source systems. These datasets are inherited, and you cannot modify them. However, you can use them to create new datasets.
- The Created datasets tab shows the datasets that workspace members created.
The File storage tab shows the files uploaded to the workspace and lets you download them. Note that this feature is only available for the workspaces that have a subscription for File storage.
The Shared with me tab shows the datasets that were shared with you. You cannot modify the original datasets that were shared with you. However, you can copy those datasets and modify the copies.
The Data Catalogue table can show these columns:
- Dataset name: The name of the dataset.
- Schema: The schema associated with the dataset.
- Assets: The assets associated with the dataset.
- Available time period: The period for which data is available in the dataset.
- Shared By: The workspace or user who shared the dataset with you.
- Shared With: The recipients with whom the dataset is shared.
- Last Modified UTC: When the dataset was last modified, shown in UTC.
The table does not show the dataset type.
Dataset ID and actions
When you open a dataset, you can find its ID in the URL after datasets. For example, in the URL https://dw.veracity.com/veracity/ws/f6427539-6y63-41d0-8795-b878213631d8/dataCatalogue/datasets/4f7rfb44-b632-4d78-843f-0j15a66k8944, the part after datasets/ is the dataset ID, which is 4f7rfb44-b632-4d78-843f-0j15a66k8944 in our example.
When you open a dataset, its available actions appear in the top-right corner. Hover over an action to see information about what it does.
- Dataset info: View the dataset name and description.
- Save as new: Save the current view as a new dataset. The icon that was previously labelled Save is now labelled Save as new.
- Download: Download the dataset.
- Generate SAS token: Select the key icon to generate a SAS token for accessing the dataset.
- Delete: Select the bin icon to delete the dataset when this action is available.
- Share: Select the button next to the action icons to share the dataset.
To select columns to display
When you open a dataset, go to its Dataset tab. Below the tab name and above the table, the Columns button shows how many columns are currently visible out of the total number of columns in the dataset. For example, Columns (3 out of 20) means that the table shows 3 of the 20 available columns.
To change which columns are visible:
- Select Columns. The Visible Columns pane opens on the right side of the page.
- Search for a column by name.
- Below the search box, select or deselect all columns. You can also select or clear the checkbox next to each column in the list.
- Hover over the tooltip next to a column name to see information about the data in that column.
- At the bottom of the pane, choose one of these actions:
- Apply: Apply the visible-column selection to the table.
- Reset: Restore the default column selection for the dataset.
- Cancel: Close the pane without applying your changes.
Types of datasets
Datasets can be saved and shared as:
- Data live streams (dynamic) dynamic: When there is a change in a dataset, it gets automatically updated.
- Snapshots: When you download a dataset, you get a snapshot of the data. That is, the downloaded dataset contains the state of the data from the time when it was downloaded.
In Data catalogue > Created datasets, you see the following types of datasets:
- Created: Datasets created in your workspace.
- Shared: Datasets shared with you or your workspace. You cannot modify them (but you can create a copy and modify it), and the original sharer has decided if you can share this dataset with others.
- Uploaded: Datasets created from CSV files.
- If you have a Schema management subscription, when uploading a new dataset, you must select a schema with an active locked version to validate your file against. The columns in the file must match the schema definition before the dataset can be created.
Tags for datasets
You can add tags to datasets so that you can find the datasets you are looking for easier and faster. You can also edit and delete tags.
To edit or delete tags for a dataset, open the dataset, go to the Details tab, and next to Tags, select the pencil icon. To delete a tag, select the X icon next to its name. To edit a tag, remove the old one and create a new tag.
To add a tag to a dataset:
- In Data catalogue, open the dataset.
- Go to the Details tab.
- Under Tags, select Add tags.
- Enter key and value, and then select Add.
- To save the tag, select Save and close.
Note that you can also add tags when you are creating a new dataset.
For example, if you want to add a tag 'Tonnage : 5000':
- For key, enter 'Tonnage'.
- For value, enter '5000'.
Each dataset can have up to 100 tags. For each tag, the key length should be between 1 and 20 characters and the maximum value length is 50 characters.
To create a dataset
To create a derived dataset:
- Select an existing dataset.
- Apply filters to get relevant data.
- Save the dataset.
Veracity suggests using an existing template for creating your datasets. The templates are shown in the Home tab under the navigation menu. Note that a template can contain one or more datasets.
To create a new dataset from a template:
- In the Home tab, select a template.
- If there is more than one dataset in the template, select a dataset.
- In the right corner, select the Save as new icon and save a copy of the dataset.
- Edit the dataset to suit your needs. Consider using "Edit table properties" (the pencil icon) and filters (the three vertical lines icon).
- Optionally, to download the dataset from as a CSV file, in the right corner, select the Download icon.
To upload a dataset from a CSV file
If you are an admin, you can upload a dataset from a CSV file if your workspace has Schema management subscription.
To upload a dataset from a CSV file:
- On the Data catalogue page, select Upload New Dataset in the top-right corner.
- In the window that opens over the page, select the CSV file that contains the dataset you want to upload.
- When the window asks you to select a schema, choose one schema from the list. The uploaded dataset must conform to this schema.
- Use the search box to find a schema.
- To inspect a schema before selecting it, hover over its row and select Show on the right. Data Workbench opens the schema in Schema Manager.
- Select the schema, then select Next. Data Workbench checks whether the uploaded file conforms to the selected schema.
- If validation succeeds, Data Workbench uploads the dataset and displays a success message.
- If validation fails, the same window explains what must be corrected before the dataset can be uploaded. Select Choose Another File to choose a different CSV file.
To share a dataset
- In the Data catalogue tab, open the dataset you want to share.
- In the top right corner, select the share icon.
- Under Share access with, enter the email address of the person or workspace you want to share the dataset with. Alternatively, select the contact list icon to choose the recipient from the list of previously used contacts.
- Optionally, to allow the recipient to share the dataset with other people, tick the box next to Allow recipients to share this dataset with others. You can revoke the sharing permission later.
- Optionally, under Add note to recipient, add a message to the person with whom you are sharing the dataset.
- To share the dataset, select the Share button. The recipient will receive an email notification with a link to the dataset.
Note that:
- You can share a dataset with workspace only if someone from your workspace has already shared a dataset with the target workspace and its admin has added it to the target workspace.
To request sharing a dataset
You can ask a data provider to share a dataset with your workspace. A data provider has stored large amounts of data, such as time series data (IoT) for solar plants, and they can share a subset of this data with you.
Note that if you do not see the Request data button, your workspace is not subscribed to any data providers that support this feature. To enable it, contact Data Workbench support and request access to the "data request" feature for a specific provider subscription.
To request that a data provider shares a dataset with you:
- In Data Workbench UI, go to Data catalogue.
- In the upper right corner, select Request data.
- In the window that shows, under Dataset name, enter a name for the dataset you want to create.
- Under Data provider, select a data provider.
- Fill in other fields in the form.
- To send your data request, select Request
Your data request will be processed, and when it's complete, you will see your new dataset with the requested data in your workspace's Data Catalogue in the Created datasets subtab.
Below are detailed information on the fields in a data request:
- For Data provider, you can select only one data provider from the providers subscribed to your Data Workbench.
- For Portfolio, a portfolio is a grouping of sites (assets), and you can select only one portfolio.
- A Site is an asset (for example, a solar plant or a windmill), and you can select only one.
- For Device type, you can add one or multiple devices based on site (for example, a transformer or inverter). A device is a different component of the site that can provide data (usually, it is time series data).
- For Add parameters, each device type has different parameters that can be configured for the request, and a parameter can only be selected once for a device type. A parameter is one data channel where time series data are logged. There can be many parameters per device. A parameter can only have one value at any given time, for example, for a car's speedometer a parameter can be the current speed of the car in kilometers per hour.
- For Aggregation, each parameter has an aggregation setting (for example, default, min, max). A parameter can only have one aggregation for a device type. This is how data is aggregated given the granularity time period; for example, "min" would aggregate with the lowest value recorded in the time period (for example, within 5 minutes if that was the granularity)
- For Granularity, this is the time unit for the granularity. For example, it can be in minutes.
- For Interval, select the start and end date for the data you are requesting. For example, you can request data from 20 January 2024 to 10 March 2024.
If your request is declined
If a data owner declines your request, the dataset is not shared with your workspace. From the requesting workspace, workspace admins can:
- Resend the declined request to a different data owner without creating a new request.
- Abandon a declined request that is no longer needed and optionally include a note.
Use the Declined and Abandoned filter chips to find non-active requests. Abandoned requests are hidden by default; use the show/hide abandoned control to display them when needed.
To handle incoming dataset share requests
When someone requests access to one of your datasets, the request will appear in the Requests tab of the Data Catalogue.
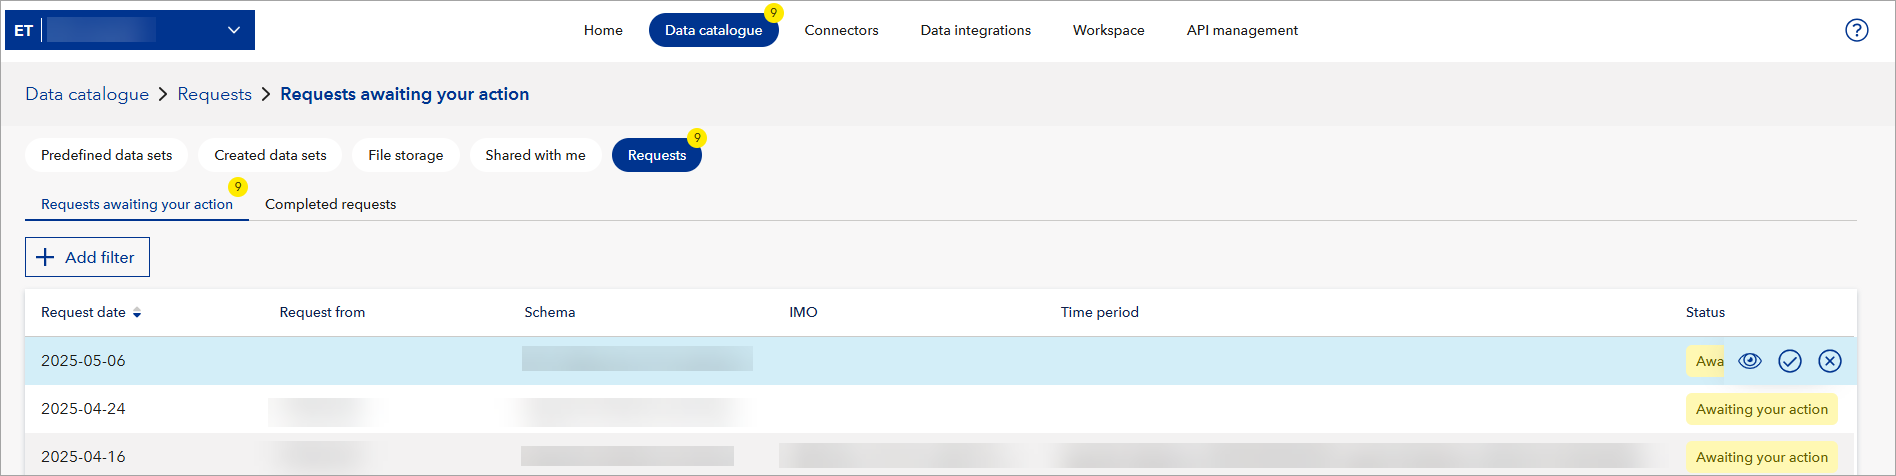
This tab includes two views:
- Requests awaiting your action - shows incoming dataset share requests that you can respond to.
- Completed requests - shows all past requests and their outcomes.
You'll also receive an email notification when a new request is sent to your workspace.
Guest recipients can open a dedicated guest request list and details view without workspace access, then approve or decline a request.
To open step-by-step guidance for the sharing workflow, select Get Started in the Share Requests page header.
In the Requests awaiting your action view:
- You can select Add filter to narrow requests by Schema, Request from, or data owner. Schema-aware filters adapt to the selected schema version so that only supported filters are available.
- Requests can appear individually or as grouped rows. A grouped row shows its item count. Select a row to open its details; from grouped request details, you can select an individual request in the group and view its associated data and dataset preview.
- Admin users can select multiple requests, assign a data owner to them, and apply a shared note.
- To approve or decline multiple requests, tick the box next to each request, then select Approve or Decline in the top-right corner of the page.
What happens when you respond
- If you Approve the request:
- A dataset is created in both your workspace and the requestor's workspace.
- The dataset will be visible in the requestor's Data Catalogue.
- If you Decline the request, the dataset is not shared. When declining from a workspace, you can optionally add a note explaining the reason. The requester receives this note. Guest users must add a note when declining from the guest view. After a guest successfully declines a request, the completed requests view opens automatically.
Even after a request has been accepted, you can still revoke access later:
- Go to the Completed requests view.
- Select the approved request to open its details.
- Select Revoke and decline to withdraw access.
To modify, save, and share a dataset
- In the Data catalogue tab, open the dataset you want to modify.
- Modify the dataset.
- In the top right corner, select the share icon.
- In Dataset name, you name the new (modified) dataset you create.
- In Share access with, you select with whom you want to share the dataset.
- If you tick the box saying 'Allow recipients to share this dataset with others', they can reshare the dataset.
- Optionally, you can add tags to the dataset.
- Optionally, you can add a description to the dataset.
- Optionally, you can add a Note to recipient. This message will be sent together with the link to the shared dataset.
- To save your new dataset and share it, select the Save and share button.
To see how to save and share a new dataset, click this link to watch the video.
To update a dataset
To update a dataset, it must be listed under Created datasets and the Update dataset action must be available for it.
To update a dataset:
- In the Data catalogue, go to Created datasets and open the dataset you want to update.
- If your workspace has the Schema management subscription, you will see the Update dataset button in the top right corner. Select it.
- In the dialog window that opens:
- Upload a CSV file - Drop or select a file. The file must be in CSV format, no larger than 1 GB, use commas as delimiters, include headers for all columns, and have a filename without special characters.
- Validate the file against the schema - The uploaded file is compared with the schema used for the dataset. If the columns do not match, an error message is shown and the update cannot proceed.
- Choose how to apply the data - If validation succeeds, you can select the update method. The available options depend on whether the schema defines key columns:
- No key columns: Add data, Overwrite data.
- Key columns set: Update data, Delete data, Overwrite data.
- Confirm changes - For Delete and Overwrite, a confirmation dialog is shown. Progress and results are displayed with toasts.
Concurrent updates
If another admin modifies the same dataset (for example, by sharing it or saving a filtered view) while an update is in progress, their changes will apply to the version of the dataset that existed before the update.
To see datasets shared with you
To see datasets shared with you, in the Data catalogue tab, go to the Shared with me tab.
Note that:
- You cannot edit datasets that are shared with you.
- You can reshare the datasets only if the person who has shared them has enabled resharing.
- If you apply filter to a dataset and then reshare it, the receiver will see only as much as the filters allow. For example, you can have a dataset with information on your ten vessels but apply filters that show only two relevant ships and then share it with your business partner.
To add a shared dataset to your workspace
- Open the dataset that was shared with you. You can follow the link from the email notification you received or find it in the "Shared with me" tab.
- Select the Add to your workspace button and then select a workspace.
- Select the button to go forward. This will add the dataset to your workspace.
Note that, to add a shared dataset to a workspace, you must be an admin of this workspace.
To revoke access to a dataset
To revoke access to a dataset:
- Go to the dataset.
- Go to the Details tab.
- Under Shared with, select the pencil icon. A pop-up window with the list of users will appear.
- In the row with the user's or workspace's name, to revoke their access, select the X icon. After that, the icon changes to the "Undo" icon. If you have revoked access by accident, select the "Undo" icon to revert it.
- Select the Save and Close button.
When you revoke a user's or workspace's access to a dataset, they are notified about that by email. Also, if they have reshared the dataset with other people, they will loose access to the dataset too.