Resources
The 'Resources' page lets you manage files (like Power BI reports) and web app connections in your VAP service. It includes two subtabs:
The 'Resources' page lets you manage files (like Power BI reports) and web app connections in your VAP service. It includes two subtabs:
- File: Opens by default.
- Web App: Available only for selected services; most services do not include Web App support by default.
Tutorials
You can check available VAP and PowerBI tutorials here.
To upload a file
- In the left navigation sidebar, select the plus icon.
- Select Add Resource File.
- Under File Name, name the file.
- Then, drag and drop the file from your local machine onto Drop file here or click to upload or select Drop file here or click to upload to add the file from your local machine.
- In the bottom right corner, select Save.
Resources table
Resources are shown in a table and each resource is presented in one row. Some columns are sortable which is inidcated by arrow symbols next to the column name. To sort the column, select its name.
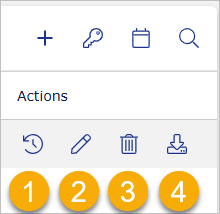
In the Actions column, you can:
- See the history of the changes done to the resource (1).
- Edit the resource (2).
- Delete the resource (3).
- Download the resource which file type is .PBIX (4).
Note that:
- Due to limitations set by Microsoft, you cannot download a large .pbix. It may time out after 4 minutes. If it happens, send a support ticket to get help to download the report. For more information, go here.
- Downloading .PBIX file types is only possible if a System Admin enabled it. To enable the download of Power BI files, on the Config page, in the Tenant Properties, select Edit and toggle on Allow download Pbix.
To upload a file
Once you have built your report in Power BI, you can upload it into VAP and share access to it with your clients.
By default, VAP will use the data sources from the report, but you can override and update them when uploading a file. For details on data sources and security, go here.
To upload a file:
- In the top right corner, select the plus icon. Alternatively, from the left sidebar, select the plus icon and the Add Resource File button.
- Under File Name, enter the name for the file. Veracity recommends including information like client name, report date, or upload date.
- Drag and drop the file onto Drop file here or click to upload, or select it manually. Supported formats: PBIX, PDF, PNG, JPEG, GIF, RDL.
- Under Personal data policy, confirm if the file contains no personal data or, if personal data is used, confirm you are following the data processing terms that are linked as Veracity DPA.
- Select Upload.
If you upload a Power BI report:
- Set the Privacy Level (see below).
- Toggle I accept and understand that I'm responsible for the content I share.
- Optionally toggle I am using Azure Analysis Service if you are using this service. Using this as a data source will load your data significantly faster than from Azure SQL DB. Before enabling this toggle, check the prerequisites under 'To use Azure Analysis Service as a data source' below.
Note that:
- For first-time database connections in VAP, use the warning icons to set credentials.
- If your data source cannot refresh automatically, either ensure it's stored in a supported location or replace files manually to update data.
Privacy Level
There are the following privacy levels:
- None
- Organizational
- Private
- Public
For details on privacy levels, go here.
Note that privacy levels set in Power BI Desktop are not transferred during the upload. However, after uploading the report, you can set data privacy for each data source separately. None was a default setting earlier, before privacy levels were supported.
For organizational privacy level
Suppose the privacy level in Power BI Desktop data source is organizational. In that case, you must also set it on the data source in your service to avoid issues with refreshing the data source. For details, go here.
To set a privacy level for a data source
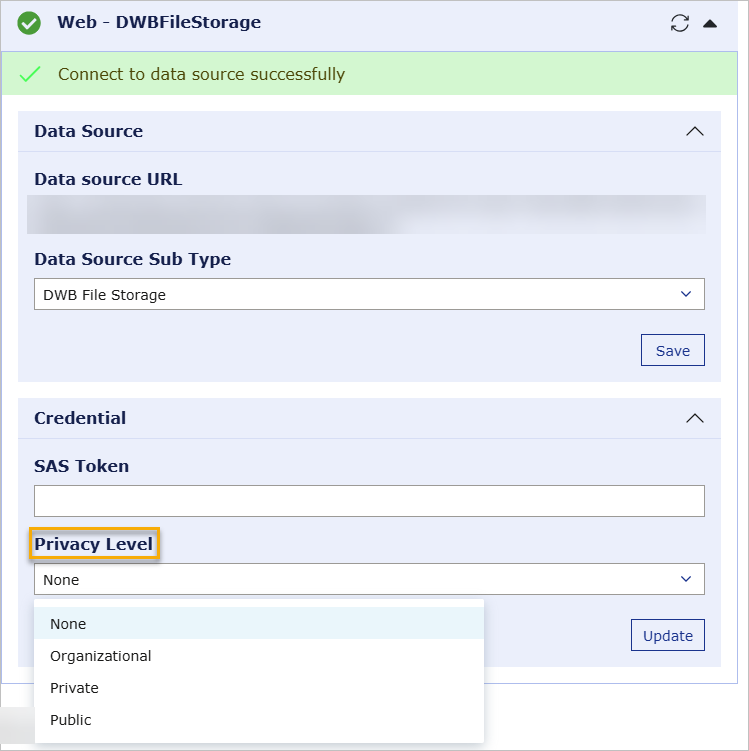
To set a privacy level for a data source, in the Admin Panel > Manage Files, in the row with the name of the report:
- Select the editing icon (pencil).
- For each data source, select the Load data source button.
- Under Privacy Level, select an appropriate privacy level.
- To confirm the changes, select Update.
To use a Paginated report
You can upload a paginated report in .rdl format. Paginated reports are ideal for certificates, audit findings, purchase orders, or long tabular data. To learn more go here
Service Principal required
Your VAP service must use a Service Principal account. Legacy Power BI setups cannot upload paginated reports. If you cannot upload an .rdl file, contact VAP support.
Supported data sources
- Databases: Azure SQL.
- Semantic models: Azure SQL, on-prem SQL, Web (API), files (.csv, .xlsx), Azure Blob.
For more information, see Supported data sources.
Reloading and session expiry
- Reports reload after 1 hour of interaction (reload icon will appear).
- Inactive sessions expire after 10 minutes. Use 'X' or 'Refresh' to resume.
To edit a resource file and check connections
To edit a resource file, in the Actions column, select the edit icon.
From the edit page, you can:
- Change the File Name.
- Select Load data source to check the connections to the data sources used by the semantic model.
The data sources are displayed in separate sections. The number of sections depends on how many data sources are used by the semantic model. Expand a section to view its connection details and status.
Connection status is indicated as follows:
- Green: VAP can successfully connect to the data source.
- Yellow: VAP cannot connect to the data source. This can be expected if, for example, the report uses data imported from a local file or another location that VAP cannot access. Imported data can still be displayed in the report, but VAP cannot refresh data from that source.
If the semantic model uses an on-premises SQL data source and a Power BI gateway has been configured, the gateway information and connection details are displayed in the corresponding data source section.
To Schedule Refresh Plans
Admins (Data Admins, Report Admins, and System Admins) can schedule automatic refreshes for Power BI reports to keep data up to date.
In the top right corner of Resources > File, select the schedule icon.

In the panel, add, edit, or delete a refresh plan.
Set the start time, interval, and number of daily refreshes (up to 48 times per day, every 30 minutes).
Note that:
- Refreshes run as background tasks.
- User interactions (like opening or filtering reports) are prioritized, so refreshes may be delayed during busy periods.
Optimize performance with the Refresh Time Chart
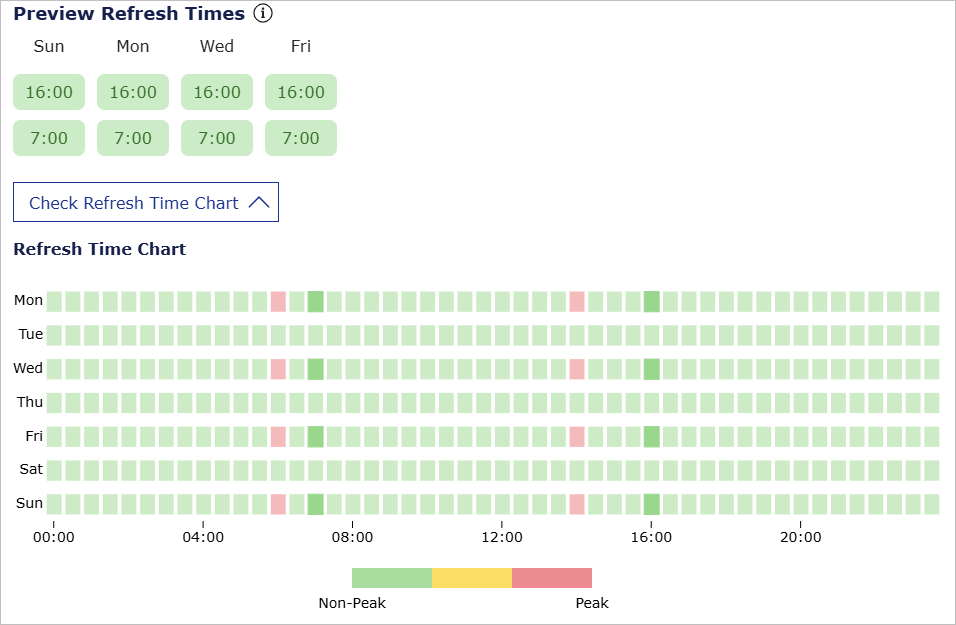
When you add or edit a Refresh Schedule Plan, you can Preview Refresh Times to check for the best time to schedule a refresh, and you can also click Check Refresh Time Chart to visualize this information.
Peak hours are red, and non-peak hours are green. Try to schedule your refreshes during green hours to get smoother performance.
Why timing matters
Refresh operations are resource-intensive because they:
- Load new data
- Recalculate models
- Update visuals in the background
In contrast, user clicks (for example, opening a report) are lightweight since they only display already-loaded data.
When too many refreshes run at once, they can slow down the entire VAP service in your region. By scheduling refreshes during off-peak (green) times, you help maintain good performance for everyone.
Note that refresh schedules don't auto-adjust for daylight saving time. Update manually when DST changes.
To apply a refresh plan
To apply a plan:
- In a PBIX row, under Refresh, select the schedule icon.
- Pick a plan under Select a Schedule Plan and select Save.
Note that paginated reports (.RDL) do not support scheduled refresh.

To refresh a file on demand
Trigger an on-demand refresh for PBIX or RDL files with semantic models:
- In the report row, under 'Refresh', select 'Refresh Report'.
Note that most semantic models with dynamic data sources can't refresh in paginated reports. See Microsoft docs.
Configure Data Workbench Service Account
If your reports use Data Workbench data sets, configuring your Data Workbench Service Account allows the necessary connection details to be automatically filled in whenever needed. This saves you from manually entering them each time you access your data sets.
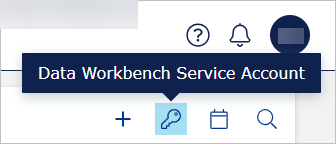
To configure your Data Workbench Service Account, select its icon in the top right corner and add the following information:
- Data Workbench workspace ID: Check here how to find it.
- Data Workbench workspace name: You can find it in your Data Workbench > Workspace > Details tab.
- Data Workbench Service Account ID: Note that you can only add an account with "Grant all workspace data" enabled.
- Account Secret.
Data Workbench data set ID
When you open a data set, you can find its ID in the URL after datasets. For example, in the URL https://dw.veracity.com/veracity/ws/f6427539-6y63-41d0-8795-b878213631d8/dataCatalogue/datasets/4f7rfb44-b632-4d78-843f-0j15a66k8944, the part after datasets/ is the data set ID, which is 4f7rfb44-b632-4d78-843f-0j15a66k8944 in our example.
For more details, go to Data Workbench documentation.
Data Workbench data source and SAS tokens
If your Power BI report uses a Data Workbench data set as a data source, you must provide a SAS token (access token) for this data set.
Connection Success ≠ Refresh Success
Even if the data source shows Connect successfully during upload or edit, scheduled or on-demand refreshes may still fail with the error
The credentials provided for the Web source are invalid.
This happens because:
- The connection test may use cached or anonymous access.- Refresh requires a valid SAS token, even if the test passed.
In VAP, you must manually enter the SAS token for a data set.
To generate a SAS token in Data Workbench
In Data Workbench UI, follow the instructions.
To generate a SAS token with Data Workbench API, refer to the API specification:
- Under Data sets, call the
workspaces/{workspaceId}/datasets/{datasetId}/sasendpoint to get a readonly SAS token for a workspace data set, including an uploaded data set. See the detailed instructions here. - Under Storages, call the
/workspaces/{workspaceId}/shares/{shareId}/storages/sasto get a SAS token for a data set in File Storage that was shared with you. See the details of this endpoint in the Data Workbench API specifications under File Storages section.
Where to enter the SAS token in VAP
After uploading your report, follow these steps to provide the SAS token:
For a Data Workbench File Storage data set:
- Go to Admin Panel > Resources > File.
- Find your report and click the Edit (pencil) icon.
- Click Load Data Source.
- Click the data source URL.
- Under Data Source Sub Type, change from Web to DWB File Storage. Then, the Credential section appears.
- Paste the SAS token into the SAS Token field.
- Click Update.
- Click the refresh icon (🔄) next to the data source name.
- Wait for the message: "Connect to data source successfully."
- Click Save to finalize.
For Uploaded Structured Data Sets
- Follow steps 1–4 above.
- Under Data Source Sub Type, select
DWB Structured Data Setand click Save. - Paste the SAS token into the SAS Token field.
- Click Update, then refresh to validate.
- Click Save.
Note that the SAS token used here is the same as the "Key" generated in Data Workbench.
Auto-renew SAS token for Data Workbench structured uploaded data sets
You can automatically renew SAS tokens for Data Workbench structured uploaded data sets (data sets of the Uploaded type that you can find in Data Workbench > Data catalogue > Created data sets).
This ensures your data connections remain active without manual intervention. If you want to learn more about structured uploaded data sets, go here.
To enable auto-renewal for a SAS token:
- Edit your report in the Resource section.
- Click the Load Data Source button.
- For Data Source "Azure Data Lake Storage", under Data Source Sub Type, select DWB Structured Dataset.
- Tick the Auto Renew SAS Token box. The token will renew automatically once a day at CET midnight.
Note that we have a tutorial showing how to Create a report with a Data Workbench source.
To use Azure Analysis Service as a data source
To be able to load data, add a Veracity VAP service account to your Azure Analysis Services Cube for PowerBI:
- If your VAP service URL starts with insight.dnv.com, add 'srvPBIAppPBIEProd@dnv.onmicrosoft.com' to your Azure Analysis Services Cube for PowerBI.
- If your VAP service URL starts with insight.veracity.com, add 'srvPBIAppPBIEProdVAP@dnv.onmicrosoft.com' to your Azure Analysis Services Cube for PowerBI.
When uploading your report file, enable 'I am using Azure Analysis Service'.
After this, VAP will pass the Veracity user 'GUID' (the unique Veracity user ID) to the 'CustomData' field in your report. The CustomData feature lets you add a Row filter in your Power BI report. Then, your report can control what Power BI data the user can view.
For more information, refer to Power BI documentation.
Web App
The "Web app" subtab shows all connections created in your VAP service. This tab is available on request, so if you don't have it, you can contact VAP support to request it.
To create a new web connection
To create a new web connection:
From the left sidebar, select the plus icon and the Add Web App button.
In the Root URL, enter the full root URL to your web application.
To accept the legal terms of using the service, below the Root URL, enable the toggle I accept and understand...
In the Display name, enter the name that the end users should see when they change between different reports or applications.
Optionally, in the Description field, describe your web application for the end users. Note that currently the description is not shown to the users.
Under Personal data policy, confirm if the web app contains no personal data or it contains personal data and you agree to process it according to Veracity DPA.
Below Personal data policy, you can enable the following toggles:
Enable Dedicated Domain Name - if your web app requires a dedicated domain name, enable this to enter the domain name.
Enable Service Worker - if your web app uses service workers, enable this and enter the full URL of the JS file where you register the service workers for your web app.
Single page application (SPA) - if your web app is a single page application, enable this, and select your app's framework, and the full URL of the "App.js" file containing routing configuration for your SPA framework.
Host In One Gateway (DNV employees only) - if your web app is hosted in One Gateway, enable this, and enter your app's Client ID for One Gateway. Then, go to your One Gateway, and allow access for the VAP Web App. Also, allow for VAP to control the authentication. After that, the configuration for your web app will disable URL direct access, making it only valid when interacting from VAP.
Attach User Token - if you want to attach user token in the request header, enable this.
Select the Check connection button to verify if your web application can connect to your VAP service.
After establishing a connection, select the Add button to add the connection.
After you have added a new web connection, go to Reports and add your web application to a new or existing report object.
After that, go to Entities and add your web application to a new or existing entity.