Data validator
You can set up automated validation for folders in File storage using schemas defined in Schema manager.
You can set up automated validation for folders in File storage using schemas defined in Schema manager.
Data Validator ensures the quality and consistency of uploaded datasets by validating them against predefined schema rules and returning structured validation results.
Schemas are created and managed in Schema manager. For detailed instructions on creating and editing schemas, see the Schema management page. This article focuses only on validation-specific configuration and File storage workflows.
How it works
- You define a schema in Schema manager.
- You configure validation rules within that schema.
- You assign the schema to a folder in File storage.
- Uploaded files are automatically validated.
- Validation results are generated in structured output folders.
Prerequisites
To use Data Validator, you need:
- A Data Workbench workspace.
- Workspace admin role (required to configure validation).
- A File Storage subscription.
- Subscriptions to:
- Schema Management
- Rule Management
- File Validation
If needed, contact Data Workbench support to verify configuratio
Role-based limitations
Only workspace admins can:
- Set up validation for folders
- Modify folder validation settings
- Remove validation
Other users can upload files and review validation results if they have folder access.
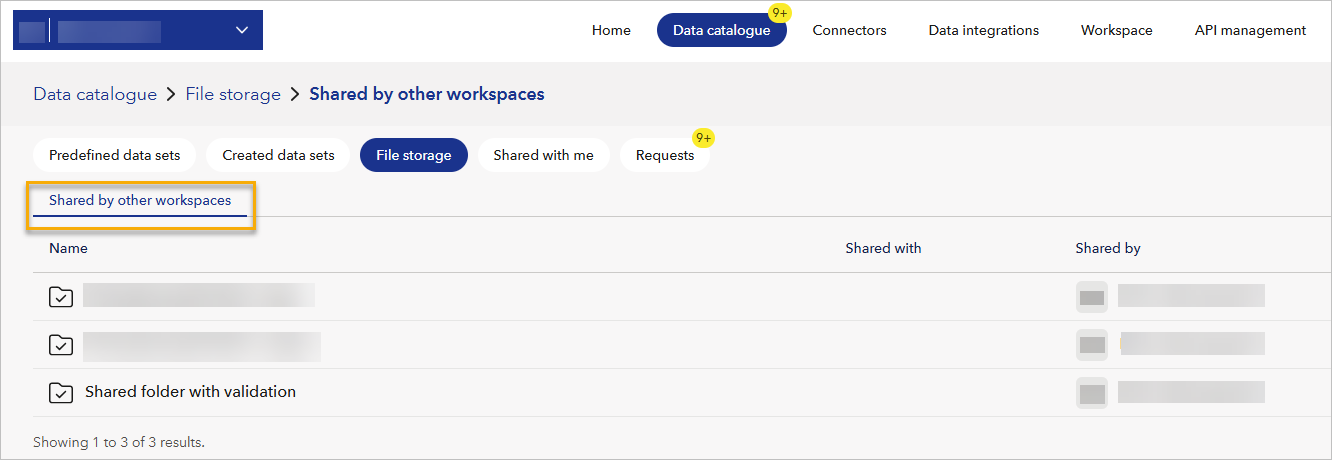
Shared folders from other workspaces
If another workspace shares folders with your workspace:
- You will see them under Shared by other workspaces.
- Validation works only if both input and output folders are shared.
- Validation schema and configuration can be viewed in Validation information.
Validation Configuration in Schemas
Validation logic is defined inside schemas. This section explains validation-specific settings only.
Column-level validation
When editing a schema, each column can have a Meta type:
- Validation - Enables validation rules for the column.
- FallbackIndicator - Marks rows where automatic correction was applied.
- Timestamp - Stores the date and time of validation execution.
For more defining columns, go here.
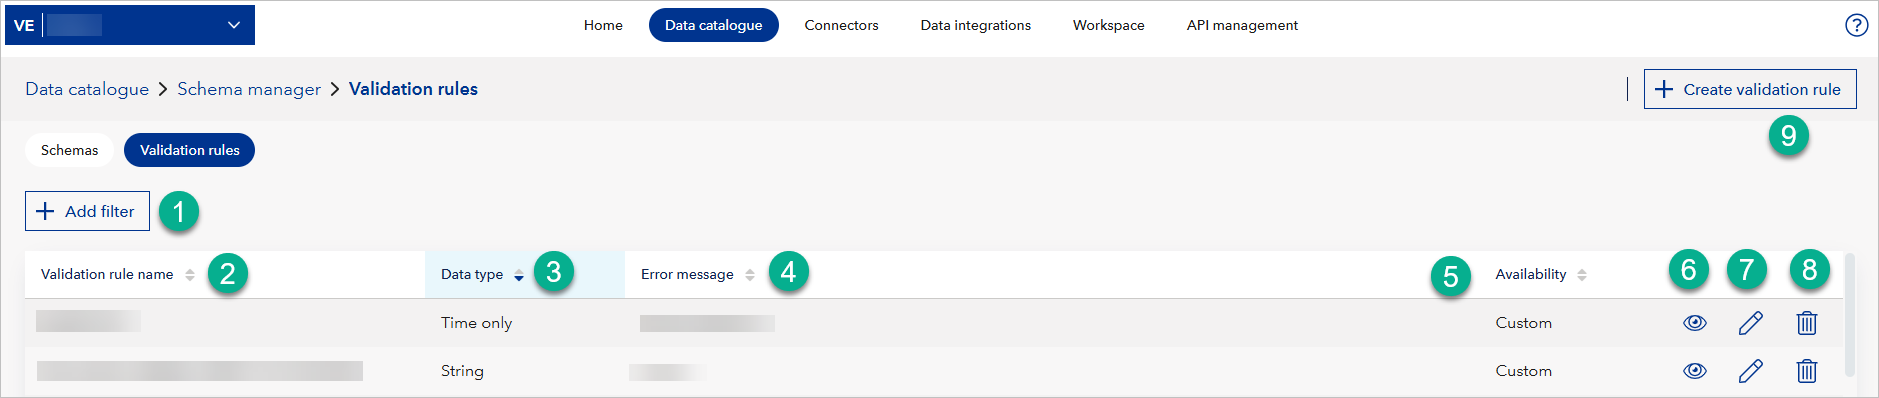
Validation rules tab overview
In the Validation rules tab, you can:
- Filter validation rules to find the rule you need (1).
- Sort validation rules by name (2).
- Sort validation rules by data type they validate (3).
- Sort validation rules by the error message they return (4).
- Sort validation rules by their availability, either predefined or custom (5).
- See details of a validation rule (6).
- Edit a validation rule (7)
- Delete a validation rule (8)
- Create a new validation rule (9).
To sort by a column (descending or ascending), click on the column name.
To apply validation to a column
Validation behavior is configured using the Meta type setting in the column editor.
Set Meta type to Validation to apply validation rules to a column. Then:
Select a Validation rule from the dropdown menu.
The list contains validation rules created in your workspace.
You can use the filter to search by rule name.Select a Severity level:
- Correction – If the value does not match the rule, it is automatically replaced with the fallback value defined in the validation rule.
- Error – If the value does not match the rule, the entire row is removed from the output result.
- Warning – If the value does not match the rule, the row is flagged but remains in the output result.
Select Add to associate the selected validation rule and severity with the column.
The rule will appear in the list below the column configuration.Select Save to apply changes. A toast message confirms successful saving.
Meta type: FallbackIndicator
Set Meta type to FallbackIndicator to track when automatic corrections are applied during validation.
If a column with severity Correction modifies a value, the corresponding FallbackIndicator column will contain a marker (for example, Y) in the affected row. This helps users identify data that was automatically adjusted.
Meta type: Timestamp
Set Meta type to Timestamp to automatically record the date and time when validation was executed.
This can be useful for tracking when a dataset was processed.
Details on FallbackIndicator meta type
A column can have its "Meta type" set to FallbackIndicator. If you want to better understand how to use it, see the explanation below.
- Validation rule with correction severity: You create a validation rule (let's call it "MustBeValidEmail") and set its severity to "Correction". Crucially, you also define a fallback value (for example, an empty string "" or a placeholder like "invalid@email.com").
- Data fails validation: A user uploads data, and a particular cell in the "Email" column fails the "MustBeValidEmail" validation rule (for example, it's missing the "@" symbol).
- Correction action: Because the severity is "Correction", Data Validator automatically replaces the invalid email value in the output data with the fallback value you defined (e.g., ""). The original input data remains unchanged.
- FallbackIndicator marks the change: If you define a separate column with its Meta type set to
FallbackIndicator(for example, a column called "Email_Fallback"), Data Validator will populate this column in the output data. For the rows where a correction was made, the corresponding cell in the "Email_Fallback" column will contain a "Y" to indicate that a correction was applied to the "Email" column in that row. - User can see the correction: When the user reviews the validated output data, they can see both the corrected value (e.g., "") in the "Email" column and the "Y" in the corresponding "Email_Fallback" column, clearly indicating that a fallback was applied. This allows them to understand that the data they are viewing might not be exactly what was originally uploaded.
Example:
- Let's say you have a column named "IsActive" with "Data type" set to "Boolean" and "Meta type" set to "Validation", and a separate column named "IsActive_Fallback" with "Data type" set to "Boolean" and "Meta type" set to "FallbackIndicator".
- If a user uploads a value of "1" (which is not a valid Boolean) in the "IsActive" column, and your validation rule corrects it to "True" (your fallback value), then Data Validator adds a "Y" to the corresponding cell in the "IsActive_Fallback" column in the output data. This "Y" indicates that a correction was made for that specific row and column.
- This helps users understand that the data has been modified automatically.
Input Data:
| IsActive |
|---|
| 1 |
Output Data:
| IsActive | IsActive_Fallback |
|---|---|
| True | Y |
To validate rows
- Ensure you have at least two columns with the Validation meta type added to your schema. Row validation requires columns to check against.
- Scroll down to the Row validation section of the schema editor.
- Select Add row to open the "Add row validation" popup.
- Fill in the Name for the row validation rule. This should be descriptive and unique within the schema.
- Optionally, add a Description for the row validation rule. Select Add to expand the description field.
- Select the Row validation type from the dropdown menu:
- RequiredIfNotNull: If any of the "Column(s) to check" have a value (are not null), then the "Column(s) to affect" must all or at least one (depending on the logical operator) have a value as well.
- RequiredIfRegexMatch: If any of the "Column(s) to check" match the specified regular expression, then the "Column(s) to affect" must all or at least one (depending on the logical operator) have a value as well. Specify this condition in the Regex pattern field.
- RequiredIfSumExceedsThreshold: If the sum of the values in the "Column(s) to check" exceeds a specified threshold, then the "Column(s) to affect" must all or at least one (depending on the logical operator) have a value as well. Specify this threshold in the Threshold field; note that you can enter up to 16 digits.
- In the Column(s) to check section, select the columns that will trigger the validation. Use the dropdown menu to choose from the available columns.
- In the Column(s) to affect section, select the columns that are subject to the validation.
- Select the Logical operator between "Column(s) to affect":
- And: All "Column(s) to affect" must have a value.
- Or: At least one of the "Column(s) to affect" must have a value.
- Enter the Error message to be displayed if the row validation fails.
- Select Cancel to discard the row validation rule or Save to add it to the schema.
- Select Save in the main schema editor to save all schema changes, including the new row validation rule.
To create validation rules
You can create validation rules and reuse them in your schema validation to avoid defining the same rule multiple times.
To create a validation rule:
- In Schema manager go to the Validation rules tab.
- In the upper right corner, select Create validation rule.
- Fill in the Name: for the validation rule (for example, "Required Email"). This is a required field and should be unique.
- Define the validation conditions: You can use one or more of the following options, depending on the Data type you selected:
- Data type (optional): Select the expected data type from the dropdown menu (for example, String, Integer, Boolean, Date). This is optional; if not specified, the data type will not be checked during validation.
- Min length (optional): Enter the minimum allowed length for string values. This field is only applicable if you've selected "String" as the data type or haven't specified a data type.
- Max length (optional): Enter the maximum allowed length for string values. This field is only applicable if you've selected "String" as the data type or haven't specified a data type.
- Min (optional): Enter the minimum allowed numerical value. This field is only applicable if you've selected a numerical data type (Integer, Float, etc.) or haven't specified a data type.
- Exclusive min: Select "Yes" if you want the minimum value to be exclusive (meaning values equal to the minimum are invalid). Select "No" if you want the minimum to be inclusive. This field is only relevant if you've provided a "Min" value.
- Max (optional): Enter the maximum allowed numerical value. This field is only applicable if you've selected a numerical data type (Integer, Float, etc.) or haven't specified a data type.
- Exclusive max: Select "Yes" if you want the maximum value to be exclusive. Select "No" if you want it to be inclusive. This field is only relevant if you've provided a "Max" value.
- Pattern (optional): Enter a regular expression to define an allowed pattern for string values (for example, for validating email or phone number formats). This field is only applicable if you've not selected "Boolean" as the data type.
- Enum (optional): Add a value one by one. For example, you might enter "US, CA, MX" for a country code field. This field is useful for restricting values to a predefined set. Select Add to add the enum values.
- Fallback value (optional): Enter a default value that will be used if the data fails validation and you've set the "Severity" to "Correction" when applying the validation rule to a column. This is useful for automatically correcting invalid data. The information icon next to the field clarifies its function.
- Must not be empty: Select "Yes" to specify that the field cannot be empty. Select "No" if empty values are acceptable.
- Error message: Enter the message to be displayed if the data does not pass the validation. Be descriptive and user-friendly. Use magic numbers {0}, {1}, {2}, and {3} for dynamic messages (column name, value, row index, rule name).
- Optionally, to cancel the changes, select Cancel.
- To save the changes in the validation rule, select Save.
To connect validation rules to a schema
- In Schema manager on the Schemas tab, select the pencil icon next to your schema.
- Under Column definition and validation, select the pencil icon next to the column you want to validate.
- In the Meta type dropdown, select Validation.
- In the Validation rule dropdown, select the appropriate validation rule.
- In the Severity dropdown, choose:
- Error: The row will be removed if validation fails.
- Warning: The row will be kept, but flagged.
- Correction: The value will be replaced with the fallback value if validation fails.
- Select Add. The rule will appear at the bottom.
- Repeat steps 2-6 for all columns needing validation.
- Select Save to save the schema with validation rules.
Data Validator in File storage
In File storage, you can set up validation for folders, and use a schema saved in your workspace to validate input data and return validated output data inside this folder.
If you need to edit or create a new schema, see how to do it in Schema manager.
To recognize a folder with data validation enabled
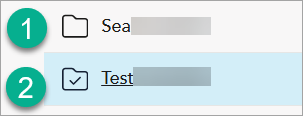
Folders with validation enabled show a check (tick) mark icon next to their name in the File storage list.
This icon appears on:
- Folders owned by your workspace.
- Folders shared with your workspace from another workspace.
- Subfolders that are configured as input for validation and their subfolders.
To see the configuration for any folder:
- Select the three dots in the folder row.
- Choose Validation information.
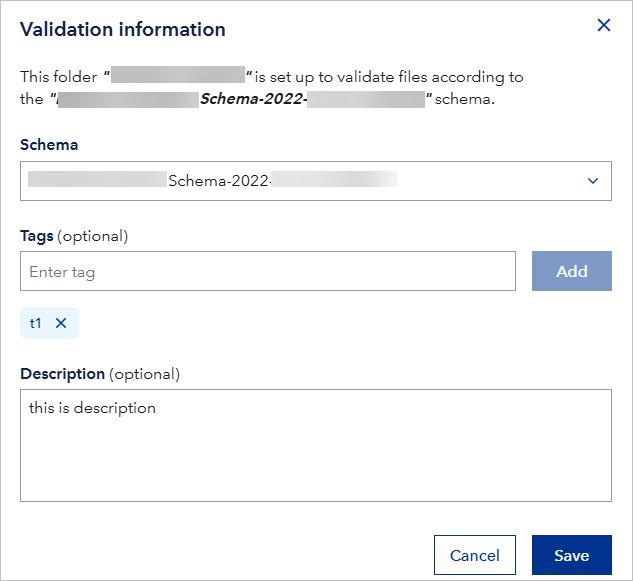
- A dialog will appear showing the validation schema, and, if they are not empty, tags and description.
This helps you confirm which folders have validation enabled even if your workspace didn't configure them.
Validation information
You can select the three dots in the row with the folder's name to open Validation information that shows:
- What schema is used for validation.
- What tags are assigned to this folder.
- The description of the validation.
If you are a workspace admin, you can change the schema used for validation, edit its description, and add or remove the tags.
To set up validation for a folder
- Navigate to Data catalogue.
- Go to File storage.
- Choose a folder for which you want to set up validation and select three dots in the row with it.
- Select Set up validation.
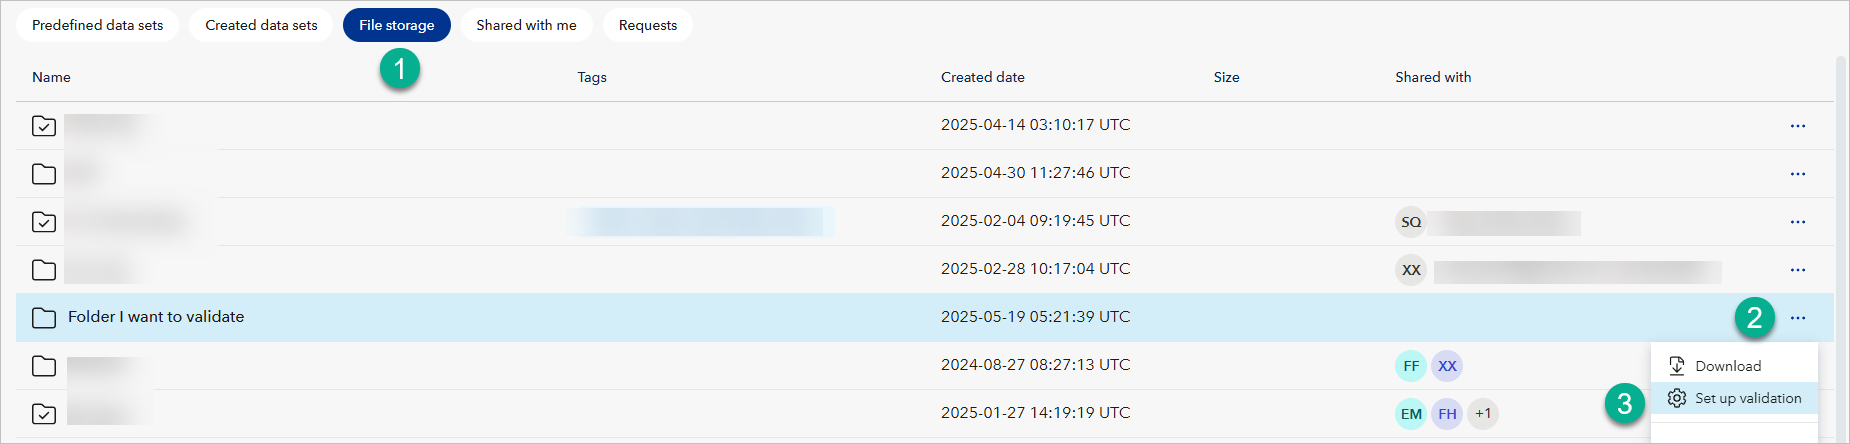
When a workspace admin sets up a validation for a folder, Data Workbench will create two subfolders inside it and name it after your folder. However, one subfolder will have the word "input" added and another will have "output" added.
Now, you can upload your files to the input subfolder and they will be automatically validated and you will see validation results in the output folder.
To remove validation for a folder
- Choose a folder for which you want to remove validation and select three dots in the row with it.
- Select Remove validation.
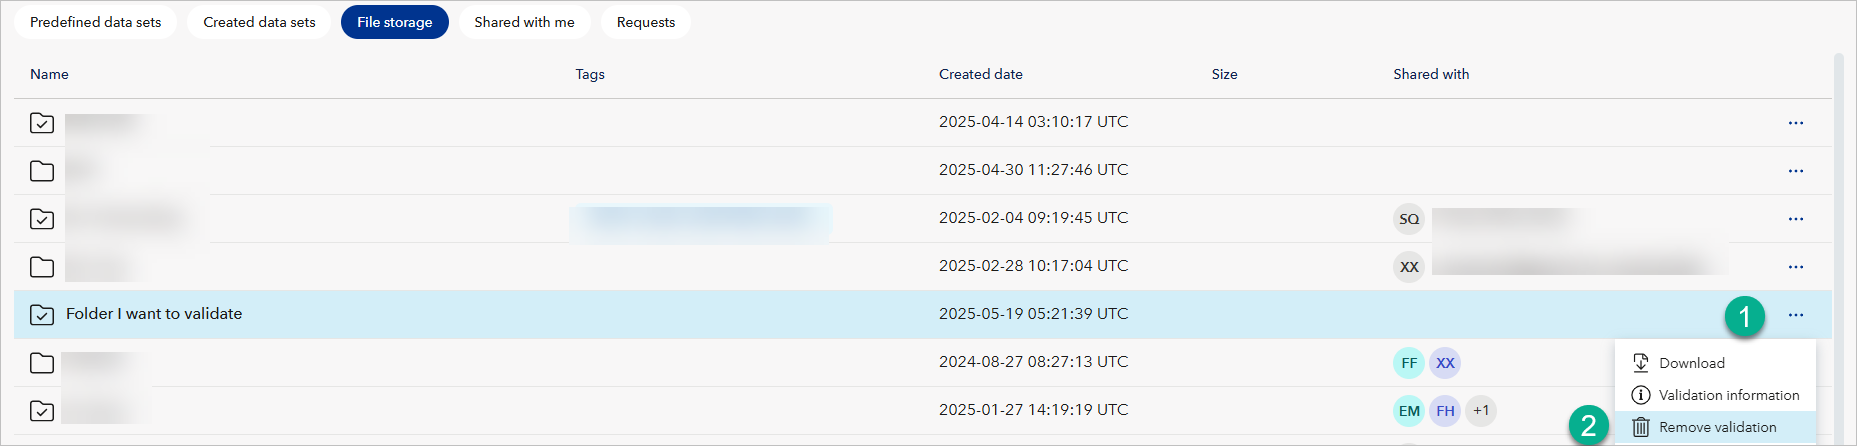
To upload and validate data
- Enter the folder you just set up validation for.
- Enter the "input" folder.
- Select Upload files.
- Select your CSV data file.
- Select Upload.
- You will see a toast message in the bottom right saying Validation in progress. Wait until it changes to Validation finished.
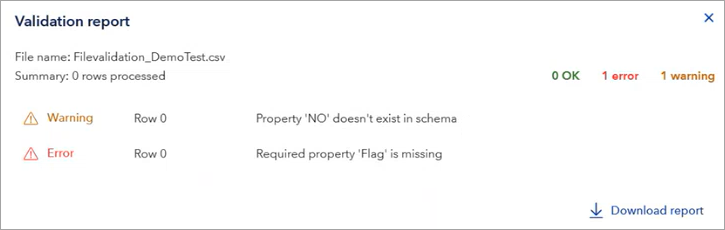
- Expand the toast message and under File name, click the name of your file. It will open validation report.
- Consider analyzing and fixing errors and warnings.
- Optionally, select Download report to download the report in the JSON format.
Below is a sample validation report.
To upload to a shared input folder
You can upload files to an input folder that was shared with your workspace from another workspace.
If validation is configured for that folder and the corresponding output folder has been shared with you, Data Workbench will:
- Automatically detect the corresponding output folder and schema.
- Trigger validation after upload.
- Display toast messages in the bottom right informing about validation progress.
After uploading files to a shared folder:
- Open the output folder to view the validation result.
- Download the summary or validated output file, just like when using folders in your own workspace.
To get a validated data file
After validation, you can get the validated data file from the output folder from the Results subfolder.
As a result of data validation, the output folder is populated with:
- An Archive folder containing a copy of the file you uploaded.
- A Log folder with detailed log information for the validation.
- A Results folder with the output after validation. You can select the three dots in the row with this file, and download it as a CSV file. For example, if the data file you uploaded had some rows that were marked as errors in the validation, those rows would be removed from the output data file.
- A Summary folder with a summary of data validation, its logs, and so on.
Note that the input and output folder that were shared with you from another workspace will show in your File storage in the Shared by other workspaces tab. You can access the result, logs, and summary files there as usual.